What we do
Any public website, any scale
Give us a target site and requirements. We extract, clean, and deliver structured data on a schedule you define — no infrastructure needed on your side
We handle the hard parts
Anti-bot bypass, CAPTCHA solving, browser fingerprinting, JavaScript rendering, proxy rotation, and schema design — all managed by our team
Delivered to your pipeline
Real-time API, scheduled files, or webhooks. Data lands in S3, GCS, SFTP, or your destination of choice — on the cadence you need
Dedicated account manager
A named person on every project. They handle onboarding, monitor delivery, and respond to issues the same day
How it works
1
Tell us your requirements
Target sites, data fields, delivery format, and refresh frequency. A 20-minute call is usually enough to scope.
2
We build and test
Our team builds the extractors, validates against your schema, and delivers a sample for your approval before going live.
3
Data arrives on schedule
Continuous delivery with monitoring. Your dedicated account manager handles any site changes or issues.
B2B & Sales
AI SDR Platforms
People and company data for automated prospecting, personalisation, and AI-driven outreach sequences
Sales Intelligence
LinkedIn profiles and company data as a full enrichment layer for account intelligence and CRM tools
AI Recruiting Platforms
Candidate profile data for sourcing engines, skills-based matching, and AI-powered recruiting tools
AI & Model Training
Training data, RAG pipelines, and agent enrichment. Schema-consistent records ready for ingestion
Creator & Influencer
Influencer Marketing Platforms
Creator discovery, audience analytics, and campaign management tools built on YouTube, TikTok, and Instagram data
Creator Discovery Tools
Search and filter 200M+ YouTube channels and 100M+ TikTok profiles by niche, follower tier, engagement, and location
Creator Intelligence
Engagement benchmarks, subscriber growth trends, SEO scores, and contact emails across all major platforms
Travel Intelligence
Rate Parity Monitoring
Track hotel and airline pricing across OTA and direct channels. Detect parity breaches in real time
Competitive Rate Intelligence
Monitor competitor pricing across target routes and properties. Feed directly into revenue management systems
OTA Aggregation
Normalised pricing and availability data across 19+ OTAs and brand sites. One schema, all sources
Reviews Intelligence
Competitive Intelligence
Monitor competitor ratings, review trends, and sentiment shifts across G2, Glassdoor, and Capterra
Voice of Customer
Structured review data for NLP, sentiment modelling, and product intelligence at scale
Employer Intelligence
Track employer sentiment, interview experience, and culture signals across Glassdoor and Clutch
WebAutomation
Pricing
Get started free

How to use the WebAutomation.io integration for Zapier

In this help article, we will show you how you can trigger a Zapier workflow upon completion of a WebAutomation extractor session in oorder to upload its results to a Google spreadsheet.

What is needed to get started?


  1. Have an WebAutomation.io account

  2. Have a Zapier account

  3. Create a Google spreadsheet where the scraping results will be uploaded to

Create an extractor on Webautomation

Firstly we need to create an extractor and run a session to scrape the data. See this article on detailed instructions on how to do this . Once you have chosen a Pre-Defined extractor and activated it to create a new session you simply click "Run Now". Once completed you will see the data results in the in the Data tab. 


Setting up a trigger on Zapier

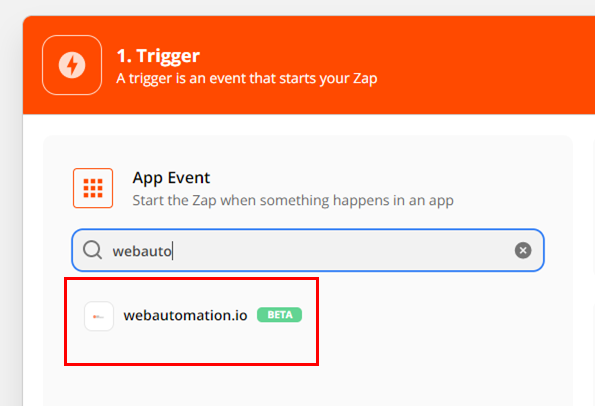
Once you have your task ready, go to Zapier, log in and click on Create a Zap! button. Since we want to trigger the workflow when the task finishes, let's choose Webautomation.io as the trigger app.
 

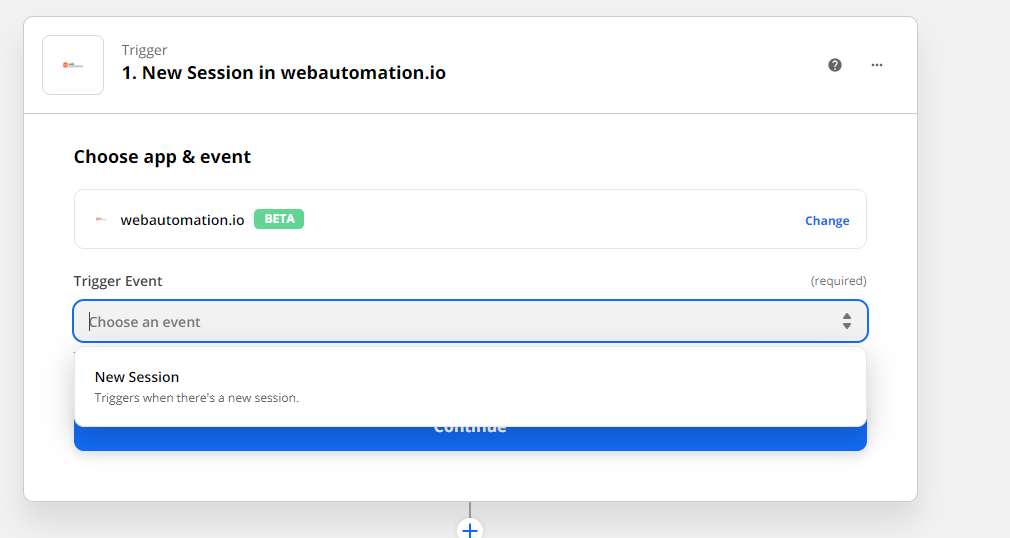
Then select the new session trigger from the list.
 

Now you'll need to connect your WebAutomation account with Zapier. For that you'll need your username (email address) and password
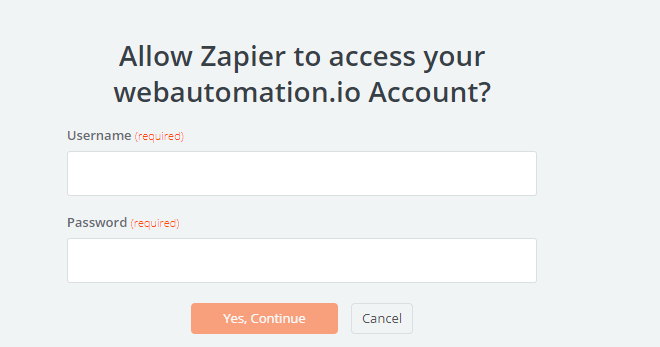
Simply input the username and password to Zapier.


After a successful connection of your Webautomation.io account, you can choose the task that you created in the previous steps from the dropdown list . Every time this task finishes, the Zap will be triggered.


On the next page, you can see sample runs for the selected task. If you don't see any runs, you'll need to go to Webautomation Data, open your task and run it. After the task is finished, you should see the last run on Zapier, where you can pick it as a sample.


Setting up an action on Zapier

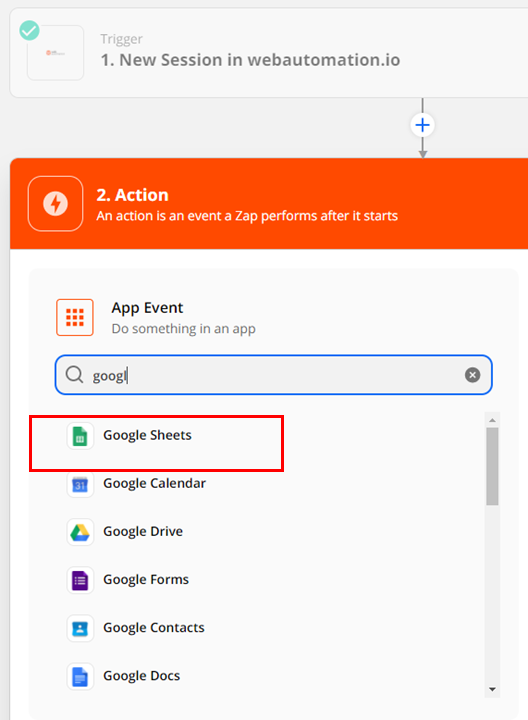
As the trigger has now been setup, you can configure an action that will be performed when the session finishes. Let's click on Add Step and choose Google Sheets from the list of Zapier apps available.
Now, choose the Create Spreadsheet Row(s) action, which is available as an action event
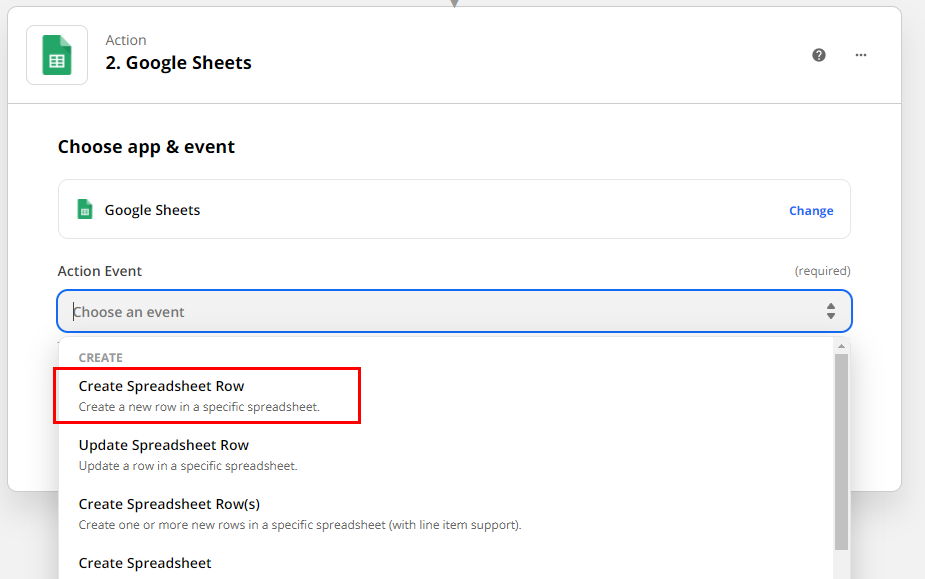
Next, you will need to connect your Google Account and grant write access for Zapier. Then we can configure the creating of sheet rows. First, let's choose Google Drive and the sheet where you want to save the data. Then we select an attribute from session results for each row in a sheet.
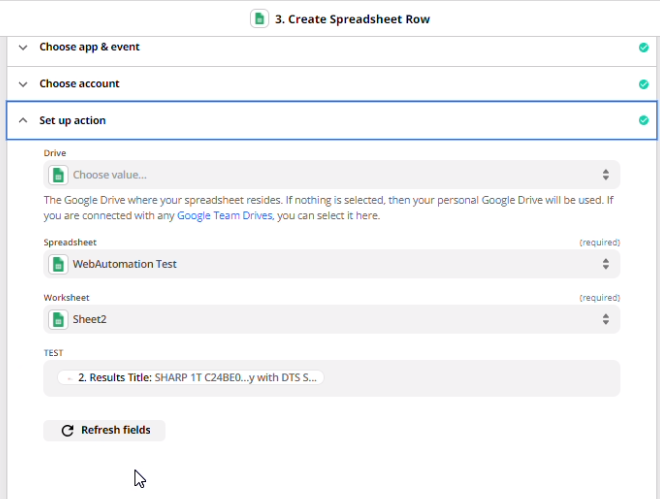
Then click the Continue button and on the next page click Send test to Google Sheets to test the workflow.


The Zap creates a test run of the action and we can see the data uploaded to the spreadsheet.


If the results in sheet look correct, you can simply name your new Zap and switch it on.


Once the Zap is on, it will be started every time an extractor session on Webautomation completes . Note that the Zap automatically created a webhook for the task.


Happy integrating with Zapier!

Are you ready to start getting your data?

Your data is waiting….

Leave a comment:

You should login to leave comments.